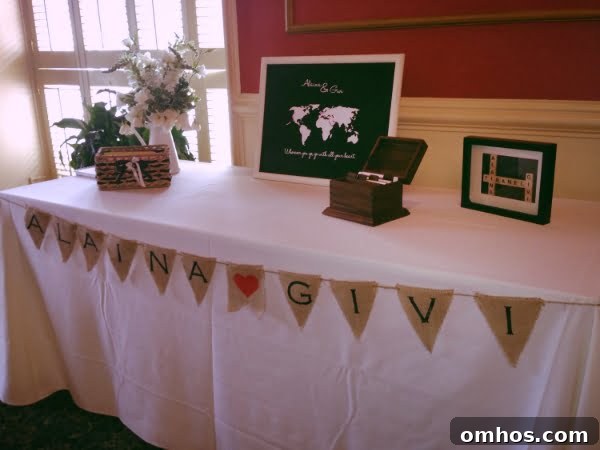
Wedding season is in full swing, and that means plenty of bridal showers to attend. I can hardly believe I have five weddings to go to this summer—yes, five! I’m at the stage where most of my friends are getting married, and I couldn’t be happier. I love weddings and all the celebrations that come with them.
Last weekend one of my oldest friends from high school had a bridal shower at the Hawthorne Hotel in Salem, MA. It was one of the loveliest showers I’ve been to, and I’ll be sharing more about it in a dedicated post soon.
Because this was a shower for one of my dearest friends, I was able to add a few personal touches. One of the projects I made was a personalized bunting banner using my Silhouette Cameo, freezer paper, burlap flags, jute twine, and fabric paint. Below I’ll walk through how I created it, with tips that made the process quick and enjoyable.
Materials I used:
- Burlap flags (purchased in packs)
- Freezer paper for stencils
- Silhouette Cameo for cutting the stencils
- Fabric paint
- Small paintbrush
- Jute or twine for stringing
- Yarn needle with a large eye
- Iron set to a cotton setting
Start by measuring your burlap flags so you know the maximum height and width for your stencils. When you design each letter, place a rectangle around it in your cutting software. That rectangle becomes the stencil’s outer border and makes it easy to center the design on each flag. Because freezer paper has a shiny side that adheres to fabric, you should cut the design as a mirror image when the shiny side will be placed down on the fabric.
For cutting freezer paper with the Cameo, I used settings that have worked well for me: blade at 3, speed at 3, and thickness at 10. Your machine or blade may vary, so test on a scrap first if you’re unsure. After cutting, position the freezer paper stencil with the shiny side down on the burlap and press it with a hot iron (I used the cotton setting). The heat will make the freezer paper cling to the burlap so paint won’t bleed under the edges.
When it comes to painting, the texture of burlap is coarse and absorbent, so choose your application tool carefully. I tried sponge brushes originally, but the paint sat on the fibers instead of penetrating evenly. A small paintbrush gave me better control and worked much faster, allowing the paint to push into the weave for a cleaner impression.
Apply a moderate amount of paint, avoiding overloading the brush to reduce seepage under the stencil. Let the paint dry to the touch—on burlap this took roughly 20 minutes for me—then carefully peel away the freezer paper. If the edges need a little tidying, you can touch them up with a tiny brush, but I found the freezer paper method produced crisp letters with minimal cleanup.
For stringing the flags, I usually fold fabric over the jute, but with these premade burlap flags I decided on a simpler approach. Use a yarn needle with a large enough eye for the jute and thread the flags onto the twine. To keep the string hidden along the back of each flag, insert the needle from the front side and pull the twine through so it runs behind the banner pieces. This creates a neat, polished look when the banner hangs.
I absolutely love how the finished banner turned out, and the bride-to-be did too—she even plans to bring it to her destination wedding to use there. I’m excited to share more from the shower in June, including photos and other decor ideas.
If you’re interested in having a custom banner made, I offer custom orders through my Etsy shop. You can also sign up for email updates to be notified when I publish the full bridal shower post and additional tutorials.