
Perfect French Toast
Perfect French Toast is a reliable weekend favorite and an inviting option for brunch. This recipe balances a rich, silky custard with a thin, crisp exterior and a tender, cloudlike interior. Using day-old bread and a patient soak produces the best texture: slices that hold together while absorbing flavor. If you enjoy warm, comforting breakfasts, this French toast recipe is worth the few careful steps it requires.
How This Recipe Became My Rainy-Day Favorite
The first time I made this dish, rain tapped the windows and the kitchen smelled of vanilla and browned butter. Saving a loaf of slightly stale bread felt satisfying, and whisking eggs with milk and cream was quietly meditative. When the slices hit the skillet and developed a golden caramelized crust, the payoff was immediate. Each bite combined a soft custard center with a delicate crisp edge—simple comfort that brightened an otherwise ordinary morning. That memory keeps bringing me back to this Perfect French Toast whenever I want a cozy, uplifting meal.
Ingredients That Make It Sing
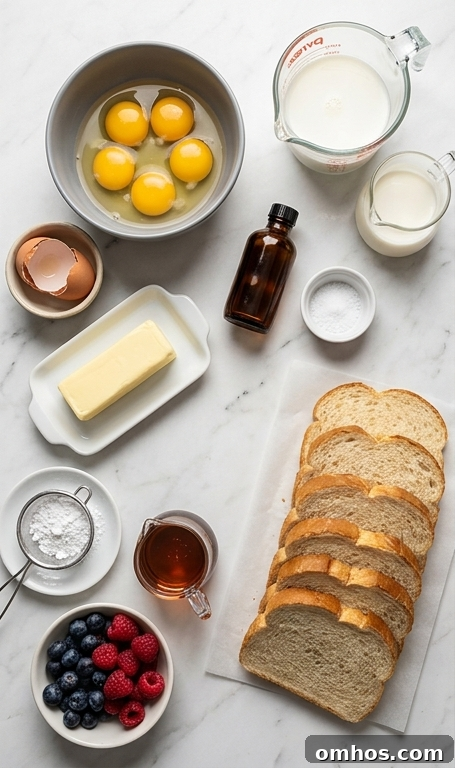
- Eggs: Provide structure and richness to the custard. Adjust yolks and whole eggs for a firmer or softer set.
- Whole Milk: Adds body and a clean dairy flavor; reduced-fat milk works for a lighter result.
- Heavy Cream: Contributes silkiness; half-and-half can be used for a lighter custard.
- Vanilla Extract: Gives aromatic depth; real vanilla or a vanilla bean scrape enhances flavor.
- Fine Sea Salt: Balances sweetness and boosts overall taste. If using kosher salt, use about twice the volume.
- Day-old Bread: Slightly stale, thick slices hold up to soaking without collapsing. Brioche, challah, or a sturdy country loaf work best.
- Butter: For cooking and finishing; unsalted is preferred to control seasoning.

Essential Kitchen Tools and Why They Matter
Having the right tools makes this French toast recipe straightforward. A rimmed baking sheet keeps finished slices warm without steaming them, and parchment simplifies cleanup. A shallow rectangular dish lets each slice soak evenly in the custard. Use a medium bowl and a whisk to combine the custard into a smooth, homogenous mixture. A heavy skillet or griddle promotes even browning and a crisp edge. A thin metal spatula helps flip slices cleanly.
- Rimmed baking sheet: Holds finished slices and keeps them warm.
- Parchment paper: Prevents sticking and simplifies cleanup.
- Rectangular baking dish: For even soaking of bread slices.
- Medium mixing bowl: For whisking the custard until smooth.
- Whisk: Blends ingredients evenly and adds a little aeration.
- Heavy skillet or griddle: Ensures even browning and crisp edges.
- Thin metal spatula: Makes flipping and transferring clean and easy.
Step-by-Step Preparation Guide
Step 1: Oven & Workstation Setup
Preheat the oven to a low 200°F (93°C). Line two rimmed baking sheets with parchment—one to hold finished slices warm in the oven and the other for the soaked bread on the counter. Arrange your soaking dish, mixing bowl, and whisk so everything is within reach. Organizing this way keeps the cooking flow smooth and prevents cold pans or crowded work surfaces from slowing you down.
Step 2: Make the Custard
Whisk large eggs with whole milk, heavy cream, vanilla extract, and a pinch of fine sea salt until the mixture is pale and slightly frothy. Whisking thoroughly creates a silky custard that clings to the bread and cooks to a tender set. If you prepare the custard the night before, refrigerate it and whisk briefly before using.
Step 3: Soak the Bread
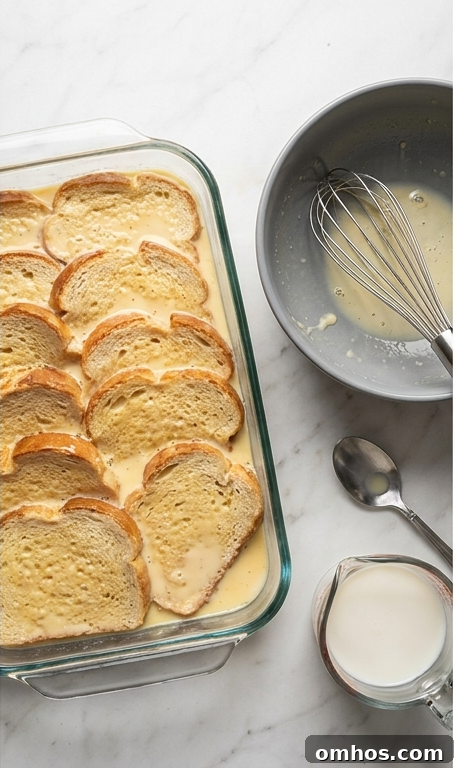
Arrange 3/4–1″ slices of day-old bread in a single layer or slightly overlapping in the rectangular dish. Pour the custard evenly over the loaf and press gently so each slice absorbs liquid without falling apart—edges should look swollen and glossy while centers remain intact. Transfer soaked slices to the parchment-lined sheet in a single layer to rest briefly before cooking.
Step 4: Cook, Keep Warm, and Plate
Melt a tablespoon of butter in a heavy skillet over medium to medium-low heat. Cook a few soaked slices at a time until each side is deeply golden and caramelized—aim for a thin, crisp crust and a tender interior. Move finished slices to the warm baking sheet in a single layer while you finish the batch, adding butter between batches as needed and wiping the pan if the butter begins to brown. Plate two thick slices stacked, dot with a pat of butter, drizzle with maple syrup, and scatter fresh berries; finish with a light dusting of powdered sugar or cinnamon sugar if desired.

Making It Your Own
Adapt this French toast recipe to the season and your preferences. In autumn, serve with warm sautéed apples or fold pumpkin puree and warming spices into the custard. For a dairy-free version, swap coconut milk and a neutral oil for frying. Try a splash of orange liqueur for a bright, French-inspired twist, or a pinch of cardamom for a fragrant variation. For gluten-free options, use a sturdy gluten-free loaf and let it dry slightly before soaking.
How to Serve
Prepare custard and soak the bread ahead of time to simplify hosting. Cook in batches and keep slices on the warm tray in a single layer to preserve crispness. Offer small bowls of toppings—maple syrup, butter, fresh berries, spiced nuts—so guests can customize. For a crowd, double the recipe and use two skillets or a griddle. For a romantic breakfast, serve on warmed plates with a single pat of butter, a drizzle of syrup, and a few fresh berries for a simple, elegant presentation.
Storage and Reheating Tips
Store leftovers in an airtight container in the refrigerator for up to two days. Layer slices with parchment between them to prevent sticking. Reheat in a 350°F (175°C) oven for 8–10 minutes to restore crisp edges and warm the center; avoid microwaving, which makes French toast soggy. To freeze, flash-freeze slices on a tray, then transfer to a freezer bag for up to one month. Reheat from frozen in a low oven, adding a minute or two so the center warms through without burning the exterior.
Mistakes Home Cooks Make and How to Dodge Them
Common pitfalls include using fresh, soft bread that disintegrates when soaked—use day-old or lightly toasted bread instead. A custard that’s too thin will cause slices to fall apart, so keep a balanced egg-to-dairy ratio for a rich coating. Cooking over too high heat can burn the exterior before the center cooks; maintain medium to medium-low heat and be patient. Finally, avoid overcrowding the pan so each slice can brown evenly and develop a crisp edge.
Ready for Brunch
This Perfect French Toast recipe rewards a little patience with golden, tender slices that make any morning feel special. Simple steps, flexible variations, and straightforward storage and reheating tips make it an ideal choice for casual family breakfasts, brunch gatherings, or a leisurely weekend treat. Give it a try and enjoy the comforting results.
Frequently Asked Questions
- Q: Can I use fresh bread instead of day-old? A: Yes, but fresh bread can fall apart when soaked; lightly toast or let it sit out to dry for a few hours first.
- Q: Can I make the custard the night before? A: Yes. Refrigerate the custard and whisk briefly before pouring over the bread.
- Q: Is there a dairy-free way to make Perfect French Toast? A: Use full-fat coconut milk and a neutral oil for frying; the texture will differ slightly but remain delicious.
- Q: How do I keep slices warm for a crowd? A: Use a low oven and a rimmed baking sheet lined with parchment to hold finished slices in a single layer.
- Q: Can I add spices to the custard? A: Absolutely—cinnamon, nutmeg, or cardamom add warmth without overpowering the vanilla.